
Nous nous retrouvons dans cet article pour parler d’escalade et transfert des demandes d’assistance vers d’autres équipes avec JSM.
Souvenez-vous, dans les articles précédents de cette série, nous avions pu voir ensemble comment nous avions mis en place plusieurs projets d’assistance technique et métier avec Jira Service Management (JSM) chez mon client :
- Avec tout d’abord une phase de réflexion sur l’utilisation de Jira dans leur contexte. Puis le choix d’une solution flexible et adaptable pour répondre à leurs différents besoins ;
- Puis l’ajout de l’orientation automatique des demandes vers la bonne cellule d’assistance.
Je vous propose maintenant de mettre en place deux nouvelles mécaniques pour permettre aux équipes d’assistance :
- D’escalader une demande d’assistance vers une équipe de niveau 2 ;
- De transférer une demande d’assistance vers une autre équipe d’assistance.
Nous verrons en détail dans cet article la mise en œuvre de la solution adoptée pour l’escalade des demandes. Le transfert ne sera pas détaillé, étant donné que le paramétrage est très proche de l’escalade.
Pour rappel, nous utilisons dans le contexte de mon client les plugins suivants :
- Script Runner ;
- Automation for Jira (inclus dans Jira Software et Jira Service Management Data Center) ;
- Assets – ex Insight (inclus à partir de la version 4.15 de Jira Service Management Data Center).
Cet article reste assez technique étant donné que nous allons écrire de nouveaux scripts Groovy.
Escalade, transfert ou les deux ?

Avant de commencer, il convient de préciser la différence entre les deux termes chez mon client :
- Dans le cas de l’escalade, l’agent demande de l’aide à une autre équipe, dite « de niveau 2 », qui dispose des compétences et connaissances nécessaires pour résoudre la demande. Il s’agit par exemple de l’équipe de développement d’un logiciel, qui va pouvoir apporter un correctif à une anomalie détectée par un utilisateur. Lors de l’escalade, l’agent conserve la main sur la demande de l’utilisateur : il reste son interlocuteur privilégié, et l’utilisateur ne voit pas « ce qui se passe » côté équipe de développement. C’est l’agent qui fera le lien entre l’équipe de niveau 2 et l’utilisateur si besoin ;
- Dans le cas du transfert, l’agent envoie la demande d’assistance à une autre équipe d’assistance qui va prendre le relais. Cela peut être nécessaire quand, par exemple, l’utilisateur s’est trompé de canal pour remonter son problème, et que la demande est tombée chez la mauvaise équipe. Lors du transfert, l’agent donne la responsabilité du traitement de la demande à l’autre équipe. Il n’en fait plus le suivi. La nouvelle équipe d’assistance en charge de la demande échange directement avec l’utilisateur.
Escalade vers la DSI : le besoin
Les trois équipes d’assistance avaient besoin de pouvoir escalader les demandes vers les équipes en charge des applications côté DSI :
- Les équipes Fraise et Ananas souhaitaient que l’équipe cible soit automatiquement déduite selon la qualification de la demande. Par exemple, si la demande porte sur l’application SUPERAPP, alors la demande doit être escaladée vers l’équipe en charge de l’application SUPERAPP ;
- L’équipe Pomme souhaitait être autonome pour choisir vers quelle équipe escalader la demande, parmi une liste bien précise.
L’équipe Fraise avait besoin également de pouvoir préciser à l’équipe cible une liste d’actions attendues lors de l’escalade.
Enfin, les trois équipes voulaient que les demandes d’assistance soient dans un état dédié suite à l’escalade, pour pouvoir les isoler facilement. La demande d’assistance devait revenir ensuite automatiquement dans un état donné lorsque la demande escaladée était résolue. De cette façon, l’équipe d’assistance saurait qu’elle peut reprendre la main.
Côté utilisateur final, selon les cas, il était souhaitable que cette étape soit complètement transparente, ou pas.
Les équipes de niveau 2 avaient besoin d’avoir accès au contexte de la demande d’assistance, la visibilité sur les échanges avec l’utilisateur final, et connaitre l’agent en charge de la demande d’assistance afin de le contacter quand nécessaire.
Transfert entre les équipes d’assistance : le besoin
L’équipe Pomme est spécialisée dans l’assistance technique et la gestion du matériel. L’équipe Fraise quant à elle est spécialisée dans l’assistance métier et l’expertise métier. Il n’est pas rare qu’un utilisateur se trompe de canal lorsqu’il fait une demande et que cette dernière tombe chez l’équipe Fraise. Alors que la problématique concerne l’équipe Pomme.
Dans ce genre de cas, l’équipe Fraise pourrait tout simplement fermer la demande de l’utilisateur en lui indiquant qu’il s’est trompé. Mais ce n’est pas très sympa : il a déjà sans doute passé du temps à essayer de formaliser sa demande sur le problème qui le tracasse depuis le début de la journée, et paf, on lui dit que non, ce n’est pas le bon endroit… et comme on ne se parle pas entre équipes et que ce n’est pas chez nous, hein, il faut tout refaire.

D’un point de vue de l’utilisateur, mon client est une seule entité. Il était donc important qu’en cas d’erreur, la bascule vers une autre équipe soit la plus transparente possible.
C’est pourquoi chacune des deux équipes avait besoin de pouvoir transférer facilement une demande vers l’autre. Le transfert devait impliquer le changement d’état de la demande initiale automatiquement, avec une résolution appropriée (pour les identifier ultérieurement).
Il fallait également que l’utilisateur soit informé de ce qui se passe. Sa première demande est fermée, mais une autre est automatiquement créée pour lui, avec un lien pour y accéder.
Question de l’utilisation de la fonctionnalité « Créer un ticket lié » standard
Au vu des différents besoins, nous avons rapidement identifié dans les grandes lignes la solution suivante :
- Que ce soit dans le cas du transfert ou de l’escalade, une nouvelle demande doit être créée dans le projet concerné. Il n’est pas question de déplacer la demande d’origine pour des raisons de suivi et analyse ultérieurs ;
- Un lien doit être impérativement créé entre les deux demandes, celle d’origine et la copie.
L’éditeur de Jira, Atlassian, propose pour répondre au besoin général d’escalade des équipes d’utiliser la fonctionnalité standard Créer un ticket lié.
Cette fonctionnalité est disponible depuis n’importe quelle demande d’assistance. Elle permet de créer rapidement une nouvelle demande dans le projet de son choix, qui sera liée avec la demande d’origine. Au cours de l’utilisation de cette fonctionnalité, un écran de création prérempli avec quelques informations de la demande d’origine est affiché à l’utilisateur qui peut alors :
- Sélectionner le projet Jira dans lequel il souhaite créer sa nouvelle demande ;
- Sélectionner le type de lien entre les deux demandes ;
- Ajuster le contenu des champs initialisés, tels que le résumé ou encore le descriptif ;
- Compléter les champs obligatoires du projet cible ;
- Choisir de copier ou non les pièces jointes.
Sur le papier, cette fonctionnalité semble répondre à une bonne partie des besoins énoncés ci-dessus, et peut être d’ailleurs tout à fait fonctionnelle pour certaines organisations. Cependant, nous avons très vite identifié plusieurs points de blocage à son utilisation dans notre contexte, ce qui nous a poussé à ne pas opter pour cette solution :
- Trop d’éléments sont laissés à la liberté et l’action manuelle de l’agent, ce qui peut engendrer des erreurs et des incohérences :
- La fonctionnalité ne déclenche pas de changement d’état : l’agent devra donc penser à le faire après ou avant la copie de la demande ;
- Le projet cible doit être choisi parmi la liste de tous les projets auxquels l’agent a accès, liste pouvant potentiellement être très longue et difficile à lire ;
- Le type de lien est au libre choix de l’agent ;
- Seuls les champs obligatoires du projet cible sont proposés dans le formulaire : l’agent ne peut donc pas compléter d’autres champs qui auraient pu être pertinents ;
- Des informations peuvent être perdues, comme les commentaires, les champs personnalisés, ou encore les pièces jointes, si l’agent oublie de cocher explicitement la case Copier les pièces jointes.
Ces éléments sont autant de possibilités de se retrouver avec des demandes bancales et des dysfonctionnements dans le paramétrage mis en place. Si l’état n’est pas bien mis à jour, les SLA par exemple ne seront pas mises en pause ou stoppées. Et si le type de lien ou l’état n’est pas correct, la demande d’origine ne pourra pas automatiquement changer d’état lorsque la demande copiée aura été résolue. Enfin si le projet cible pour l’escalade n’est pas le bon, cela va générer de la complexité pour les équipes, ainsi que du temps perdu là où on attend généralement une grande réactivité.

Donc dans le doute (et afin de préserver des forêts), nous avons choisi de partir sur une solution spécifique et adaptée aux différents besoins. Une solution technique, nécessitant l’utilisation à nouveau d’un plugin comme Script Runner.
Choix d’une solution personnalisée mais maitrisée
La solution consiste donc à mettre en place différentes transitions dédiées à chaque cas (transfert, escalade). Chaque transition permet de :
- Gérer le changement d’état de la demande ;
- Proposer un écran de transition avec des champs complémentaires si cela est pertinent ;
- Exécuter un script Groovy qui va s’occuper de réaliser toutes les opérations « sous le capot », c’est-à-dire :
- Récupérer le projet cible d’escalade ou transfert ;
- Créer une copie de la demande d’assistance ;
- Enrichir et adapter les données de la copie de la demande, avant de l’enregistrer dans le projet cible ;
- Créer un lien du bon type entre la demande d’origine et la demande copiée ;
- Informer les différents acteurs des actions menées.
Il est temps de sortir notre plus beau clavier, notre éditeur de code préféré et un thermos de café : on repart coder (enfin, on a quelques actions préparatoires à faire avant) !

Mise en œuvre de l’escalade d’une demande d’assistance pour l’équipe Fraise
Nous allons mettre en œuvre ensemble tout le paramétrage permettant de réaliser l’escalade et ce qui s’ensuit pour l’équipe Fraise. La méthode est similaire pour les autres équipes d’assistance.
Préparer le paramétrage nécessaire
La première étape consiste à préparer dans Jira tous les éléments dont nous allons avoir besoin pour réaliser notre escalade.
Nous avons vu que l’une des premières choses à mettre en place était la déduction du projet cible d’escalade selon la qualification de la demande d’assistance. Cette valeur doit pouvoir être surchargée par l’agent lors de l’escalade. Pour faire cela, nous avons besoin :
- D’identifier le projet Jira d’escalade pour chaque fiche de service d’assistance pertinente ;
- D’avoir un champ personnalisé qui remonte la liste des projets Jira.
Action 1 – Ajouter le projet d’escalade sur les fiches de service et créer un champ personnalisé
Nous avons mis en place notre référentiel des fiches de service dans l’article 2. Nous allons l’enrichir pour pouvoir renseigner pour chaque fiche de service un projet Jira d’escalade. Pour cela, nous pouvons tout simplement ajouter un attribut Projet d’escalade de type Projet. Comme cet attribut est pertinent pour nos trois équipes d’assistance, nous rajoutons l’attribut directement au niveau du type d’objet parent Fiche de service assistance.

En complément, nous créons un nouveau champ personnalisé Jira de type Sélecteur de projet (projet unique) que nous appelons Projet d’escalade. Nous ajoutons ce champ dans l’écran de consultation de nos trois projets d’assistance.
Il ne nous reste plus qu’à compléter notre script d’orientation automatique mis en place dans l’article 3 pour valoriser automatiquement le champ Projet d’escalade à partir de la fiche de service identifiée pour la demande.
Pour l’équipe Pomme, qui souhaite pouvoir choisir manuellement le projet d’escalade parmi une liste réduite, nous mettons en place le même champ Projet d’escalade sans pré-valorisation. Nous combinons l’utilisation de deux plugins pour filtrer les projets proposés dans la liste :
- Metadata for Jira, qui nous permet de définir au niveau du projet d’assistance Pomme une métadonnée qui contient la liste des projets autorisés pour l’escalade ;
- Script Runner, qui nous permet via un Behaviour de filtrer la liste des projets proposés dans le champ Projet d’escalade en s’appuyant sur la métadonnée.
Cette méthode peut être utile pour les organisations qui ont moins de projets Jira et qui n’ont pas d’intérêt à mettre en place une mécanique plus complexe de déduction automatique du projet Jira cible.
Pour isoler et identifier facilement les demandes escaladées, nous avons également besoin d’un état dédié, et de types de liens que nous utiliserons pour lier les demandes d’assistance aux demandes copiées dans les différents projets.
Action 2 – Créer l’état et le lien spécifique à l’escalade
Nous créons un nouvel état Escaladé.
Nous choisissons également de créer un type de lien spécifique par projet d’assistance. De cette façon, nous pouvons avoir des règles de gestion différentes selon le type de lien, mais aussi permettre aux équipes de développement de plus facilement identifier les demandes provenant d’une équipe d’assistance ou d’une autre.
Nous les appelons donc Transmission Fraise / DSI, Transmission Ananas / DSI et Transmission Pomme / DSI.
L’équipe Fraise souhaitait également pouvoir transmettre des indications supplémentaires à l’équipe à qui elle escalade la demande. Nous avons déjà un champ texte libre Actions attendues DSI existant dans notre instance Jira, que nous réutilisons.
Bonne pratique
Avant de créer un nouvel élément de paramétrage « transverse » dans Jira, c’est-à-dire un élément qui peut être utilisé par tous les projets tels que les champs personnalisés, les états, les résolutions, etc., pensez à vérifier qu’il n’y a pas un élément similaire qui existe. En effet, dans un souci de maintenabilité et de performance, il vaut mieux essayer de limiter le nombre de ces éléments. Et cela permet aussi d’avoir de la transversalité entre les projets (par exemple, un seul état En recette plutôt que des A recetter, En cours de recette, Recette, En recette, En recette par mon super PO, …).
Nous avons maintenant tous les éléments nécessaires pour la mise en place de notre transition d’escalade.
Mettre en place une transition dédiée à l’escalade
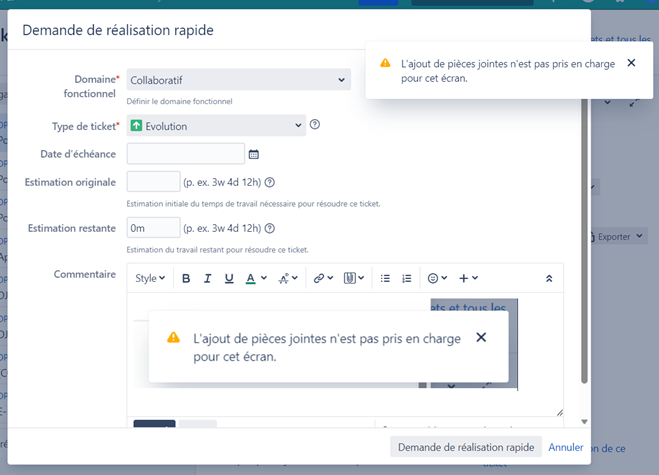
Nous devons créer et configurer notre transition d’escalade. Au préalable, nous avons créé un petit écran de transition qui reprend à minima les champs :
- Projet d’escalade
- Actions attendues DSI
- Pièce jointe
Important – Le champ « Pièces jointes »
Toujours, toujours, toujours mettre le champ Pièces jointes dans chaque écran de transition. Car si ce n’est pas le cas, lorsqu’une personne collera par exemple une image dans le champ Commentaire, elle aura un mini-message d’erreur (L’ajout de pièces jointes n’est pas pris en charge pour cet écran) disparaissant plus vite qu’il est apparu, lui indiquant que le fichier n’a pas pu être chargé. Eh oui, parce que le champ Pièces jointes n’est pas dans le formulaire. Si elle n’a pas eu la chance de voir le message, cas le plus courant, elle ne comprendra pas pourquoi son image a été remplacée par un visuel cassé.
Action 3 – Créer et paramétrer les transitions
Nous créons une nouvelle transition Escalader à la DSI qui part de l’état « En cours » et va à l’état Escaladé. Nous lui associons notre écran de transition, et nous configurons un valideur pour rendre le champ Projet d’escalade obligatoire.
En complément, nous ajoutons deux transitions supplémentaires qui permettront aux agents de ne pas être bloqués dans certains cas particuliers :
- Une transition Retourner en cours, qui permet de revenir de l’état Escaladé à l’état En cours manuellement ;
- Une transition Lier à une demande DSI existante, qui permet de passer à l’état Escaladé sans copier la demande d’assistance. De cette façon, si une demande côté DSI existe déjà sur le problème rencontré, l’agent ne la duplique pas et peut directement lui lier sa demande d’assistance.
La transition d’escalade est prête. Il nous reste à mettre en place le script qui va réaliser toutes les opérations de copie, mise à jour des données, etc. Le script est un script Post fonction, placé comme son nom l’indique en post-fonction de la transition. Vous pouvez consulter la documentation de l’éditeur (en anglais) pour en savoir plus sur ce type de script) : Post Functions Tutorial (adaptavist.com).
Action 4 – Ajouter un script Post fonction
On commence par importer les classes dont nous aurons besoin, et déclarer les différentes constantes que nous utiliserons dans le script.
Puis nous initialisons les services de l’API Java de Jira dont nous allons avoir besoin, puis nous récupérons les champs personnalisés nécessaires.
Nous récupérons ensuite les données du projet dans lequel nous allons copier la demande : la clé du projet à l’aide du champ Projet d’escalade, mais aussi son paramétrage particulier, c’est-à-dire son type de demande par défaut et le responsable des demandes par défaut.
Nous pouvons lancer les opérations : nous réalisons une copie technique de la demande. Afin de conserver un maximum d’informations, nous utilisons la méthode de copie complète, avec tous les champs. Il est donc nécessaire ensuite de réinitialiser quelques champs, tels que la date de création, les estimations de temps, etc.
C’est l’occasion de valoriser notre projet cible. Nous préfixons le résumé de la demande par la mention ESCALADE. Nous choisissons de positionner l’agent réalisant l’escalade comme le rapporteur de la demande copiée : de cette façon, il sera notifié et informé quand la demande copiée évoluera.
L’équipe Fraise voulait transmettre des informations à l’équipe DSI lors de l’escalade. L’agent peut utiliser le champ Actions attendues DSI pour cela. Il nous faut donc récupérer le contenu et le concaténer avec la description de la demande. Cela facilitera la lecture et la prise en compte par l’équipe DSI. Et cela nous évitera aussi d’ajouter le champ Actions attendues DSI dans les écrans de consultation de tous les projets éligibles à l’escalade.
Nous finalisons la création de notre nouvelle demande, ce qui nous permet de :
- Ajouter le lien entre la demande d’origine et la demande copiée ;
- Copier les pièces jointes sur la demande copiée ;
Faire un retour à l’agent pour l’informer que l’escalade est un succès : nous utilisons pour cela une classe mise à disposition par Jira, UserMessageUtil, qui permet d’afficher une petite pop-in avec un message éphémère. Le message contient un lien vers la demande copiée.

Nous y sommes ! Le script est en place, la transition est désormais fonctionnelle. Attention à bien autoriser les agents à créer des demandes dans les projets d’escalade potentiels.
Informer ou non le demandeur de l’escalade de sa demande
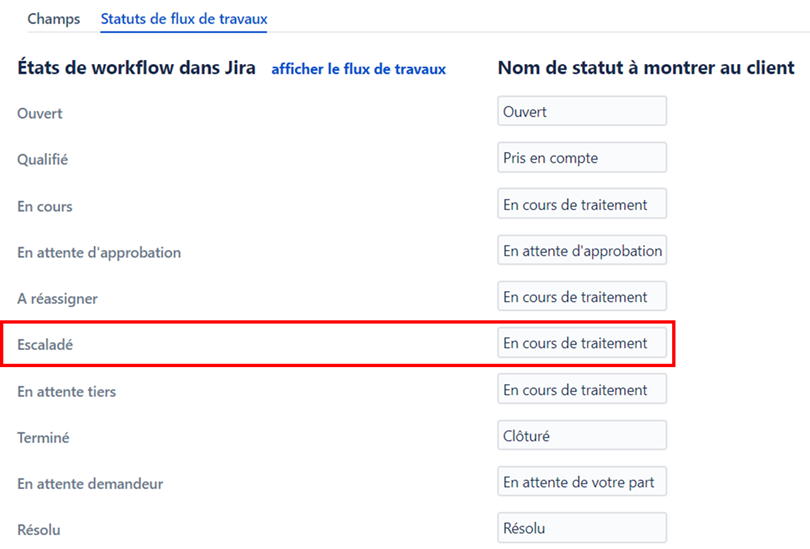
L’ajout du nouvel état Escaladé dans notre workflow nous force à nous poser la question : souhaitons-nous rendre « visible » cette étape à l’utilisateur côté portail, ou cela doit-il être transparent ? Selon l’équipe, la décision n’a pas été la même. Pour une équipe, nous avons donc laissé explicite cette étape, telle quelle.
Pour les deux autres équipes, nous avons « masqué » cette étape grâce à l’écran de correspondance entre les états du workflows et les états affichés à l’utilisateur pour chaque formulaire du portail :
Les licences JSM vs licences JSW
Il existe deux types de licences dans Jira :
- Les licences JSM (Jira Service Management), qui permettent aux utilisateurs de traiter des demandes dans les projets de type Service ;
- Les licences JSW (Jira Software), qui permettent aux utilisateurs de traiter des demandes dans les projets Software et d’utiliser les tableaux agiles.
Il est bon de savoir qu’un utilisateur peut, quelle que soit la licence dont il dispose, réaliser les actions suivantes sur n’importe quel projet, et ce quel que soit son type (à partir du moment où il en a les habilitations, bien entendu) :
- Consulter les demandes ;
- Créer une nouvelle demande ;
- Déposer un commentaire interne sur une demande ;
- Déposer des pièces jointes sur une demande.
Cela signifie que vous n’avez pas besoin de donner une licence JSW à vos agents pour qu’ils puissent escalader des demandes vers des projets Software et échanger des commentaires dans celles-ci. Et vice versa : vous n’avez pas besoin de donner une licence JSM à vos équipes de développement pour qu’elles puissent consulter une demande d’assistance, et éventuellement déposer des commentaires internes dedans. L’occasion de réaliser une économie intéressante en optimisant l’attribution de vos licences !
Automatiser le changement d’état de la demande d’origine lors de la résolution de la demande escaladée
Pour gagner en efficacité, nous mettons en place une règle automatique qui va changer l’état de la demande d’assistance quand la demande escaladée est résolue. De cette façon, la demande d’assistance retourne dans la liste des demandes à traiter.
Concrètement, la règle doit :
- Se déclencher quand une demande liée à une demande d’assistance avec le bon type de lien bascule dans un état « final » ;
- Mettre à jour l’état de la demande d’assistance.
Action 5 – Configurer une règle automatique pour changer l’état de la demande d’assistance
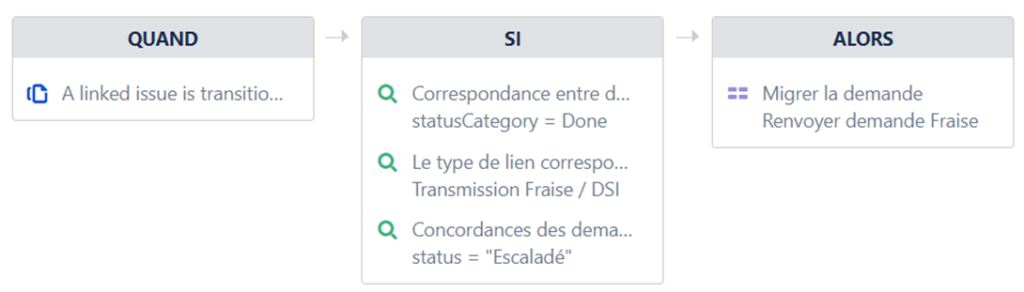
Nous créons une nouvelle règle Automatisation héritée dans le projet Fraise. Nous la paramétrons de la façon suivante :
QUAND
A linked issue is transitioned
(Quand une demandé liée à une demande d’assistance change d’état)
SI
– Le type de lien correspond : Transmission Fraise / DS
– Concordances des demandes : status = Escaladé
– Correspondance entre les demandes liées : statusCategory = Done
ALORS
Migrer la demande Renvoyer demande Fraise
Nous choisissons d’exécuter la règle avec un compte de service qui a des droits avancés sur tous les projets afin d’éviter les erreurs.
Règles automatiques standards JSM ou module Automation for Jira ?
Depuis la version 9 de Jira, Atlassian indique avoir déprécié les règles automatiques standards JSM, nommées Automations héritées. L’éditeur favorise désormais l’utilisation du module Automation for Jira. Cependant, l’utilisation de ce module nous pose aujourd’hui deux difficultés :
- Contrairement aux automatisations héritées, il n’existe pas dans Automation for Jira un déclencheur Quand une demande liée change d’état. La logique se retrouve donc inversée, il faut « écouter » tous les changements d’état de nos projets d’escalade potentiels, et donc utiliser le déclencheur Quand une demande change d’état sur un périmètre de projets très important dans notre contexte (nous avons plus de 200 projets d’escalade potentiels, brassant énormément de demandes) ;
- Il faut indiquer dans le déclencheur Quand une demande change d’état le ou les états cibles : il n’est pas possible d’utiliser une catégorie d’état, Done par exemple. Dans notre cas, nous avons encore de nombreux états finaux que nous essayons de rationnaliser au fur et à mesure. Les lister explicitement dans la règle n’est donc pas très maintenable.
C’est pourquoi nous avons fait le choix pour le moment de continuer à utiliser une automatisation héritée.
Et le transfert d’une demande d’assistance à une autre équipe d’assistance ?
La mise en œuvre de la solution pour le transfert d’une demande reste très proche de celle de l’escalade :
- Préparer le paramétrage nécessaire, c’est-à-dire créer un état et/ou une résolution spécifique pour identifier facilement les demandes transférées à une autre équipe ;
- Créer une transition dédiée au transfert, par exemple Transférer à Fraise, sans choix manuel du projet cible, puisque nous le connaissons dans notre cas ;
- Mettre en place un script Post-fonction qui gère la copie de la demande et la mise en place du lien entre les deux demandes.
En complément, il convient de rajouter dans le script l’ajout d’un commentaire public sur la demande d’origine, afin d’informer l’utilisateur du transfert de sa demande, et indiquant le lien vers la nouvelle demande créée.
Deux ou trois scripts groovy plus tard… Le mot de la fin
Vous êtes arrivés jusque là : déjà un grand merci pour votre patience et votre temps. Je concède que cette série d’articles n’est pas forcément bonne pour le mal de tête.

Mais après toutes ces étapes, nous avons vu qu’il existait des solutions pour fluidifier le circuit et le traitement d’une demande d’assistance :
- Lors de sa création, en automatisant son affectation à la cellule d’assistance adéquate ;
- En cas d’escalade ou de transfert, en copiant la demande « proprement » en un clic dans le bon projet ;
- Lors de son traitement, en ayant un maximum d’informations dès sa création puis qualification grâce aux référentiels Assets.
Nous avons aussi pu voir qu’il existe une multitude de solutions pour réussir à adapter votre Jira Service Management à vos besoins et à votre organisation. Parfois, le standard suffit. Mais l’acquisition d’un plugin complémentaire « tout terrain » tel que Script Runner peut s’avérer plus qu’utile et rentable, à partir du moment où vous avez les compétences pour l’utiliser pleinement.
Cet article n’est pas sponsorisé par Script Runner. Mais oui, je dois reconnaitre que j’aime beaucoup ce plugin et ce qu’il offre.
Si je devais donner une recommandation après ces quelques années à travailler sur ce sujet, c’est surtout d’être patient et de faire les choses petit à petit. Il n’y a pas de formule magique miracle qui vous permettra de tomber du premier coup sur la bonne solution. Même en faisant 10 sessions de brainstorming avec les plus grands experts.
C’est à force de tâtonnements, de tentatives plus ou moins réussies, d’améliorations et de retours d’expérience de vos utilisateurs que vous progresserez vers la solution qui convient le mieux. Ce qui marche pour mon client ne marchera peut-être pas pour vous, ou du moins, pas sans adaptation. Mais votre outil doit être un facilitateur pour le quotidien de vos équipes, non pas une contrainte. Cela peut donc valoir le coup de passer le temps qu’il faut pour y arriver.
Illustration de couverture par pch.vector sur Freepik