
Dans le dernier article, nous avons posé les bases nécessaires à la qualification de nos demandes et surtout à l’orientation automatique dans JSM de ces dernières vers la bonne cellule d’assistance.
Vous l’attendiez : le voilà ! Dans cet article beaucoup plus technique, nous allons voir ensemble comment automatiser l’orientation des demandes, mais aussi gérer les notifications et les réorientations des demandes en cas d’erreur. Beaucoup plus technique, car une grande partie du paramétrage mis en place s’appuie sur des scripts écrits en langage Groovy et nécessite d’avoir des bases en développement.
Alternative à l’utilisation des scripts
Selon le contexte et les besoins, il est possible d’envisager d’utiliser d’autres solutions ne nécessitant pas de plugin complémentaire, ni d’écrire des scripts pour réaliser certaines opérations, comme la mise en place de règles automatiques ou encore l’usage de post-fonctions. Mais cela nécessitera de faire des compromis sur le niveau de personnalisation attendu.
Pour rappel, nous utilisons dans le contexte de mon client les plugins suivants :
- Script Runner
- Automation for Jira (inclus dans Jira Software et Jira Service Management Data Center)
- Assets – ex Insight (inclus à partir de la version 4.15 de Jira Service Management Data Center

Etape 1 – Orienter une nouvelle demande vers la cellule adéquate
La première étape est d’orienter une nouvelle demande vers la cellule correspondante. C’est-à-dire, concrètement, valoriser automatiquement le champ Cellule d’assistance avec la cellule correspondant à l’ensemble des critères sélectionnés dans la demande, dès sa création.
Au vu des spécificités à gérer et du besoin de décliner cette fonction sur différents projets ayant différents workflows, nous choisissons de mettre en place un script Listener.
Script Listener
Les scripts Listener permettent de définir du code qui s’exécutera lors du déclenchement d’un ou plusieurs événements pour une demande donnée. Par exemple la création d’un ticket, l’ajout d’un commentaire, etc. Vous pouvez consulter la documentation de l’éditeur (en anglais) pour en savoir plus.
Pour le moment, nous souhaitons que ce script se déclenche sur la création d’une demande, pour nos trois projets d’assistance. Au déclenchement, il doit :
- Récupérer les champs de qualification de la demande, c’est-à-dire le type de service, sa catégorie et sa sous-catégorie ;
- Rechercher dans le référentiel des fiches de service du projet concerné celle correspondant à la combinaison des trois critères ;
- Si une fiche de service est bien trouvée, récupérer la cellule d’assistance associée et la valoriser dans le champ Cellule d’assistance de la demande.
C’est bien beau tout ça, mais concrètement, ça donne quoi ? Regardons ensemble des extraits du script simplifié, correspondant au besoin exprimé ci-dessus.
Script 1 – Orientation automatique de la demande
On commence par importer les classes dont nous aurons besoin, et déclarer les différentes constantes que nous utiliserons dans le script.
Les constantes en tête de script
Je fais le choix de déclarer les constantes en tête du script plutôt qu’au fur et à mesure pour pouvoir facilement les modifier en cas d’évolution, comme par exemple le renommage d’un champ.
Vous remarquerez également que j’utilise le libellé des champs personnalisés au lieu de leur identifiant technique. Là encore c’est un choix personnel que je peux me permettre de faire. En effet, nous avons une règle chez mon client qui est « un libellé = un champ ». Nous n’avons donc jamais deux champs avec le même libellé. Et je trouve cela plus lisible. Les puristes préféreront utiliser l’identifiant technique du champ.
Nous initialisons les services de l’API Java de Jira dont nous allons avoir besoin.
Nous récupérons ensuite les champs personnalisés, c’est-à-dire les trois champs de critères pour identifier la fiche de service correspondante et le champ de la cellule d’assistance qui sera en charge de la demande.
Il est possible désormais récupérer les données dont nous allons avoir besoin à partir de la demande.
Nous recherchons dans notre référentiel Assets la fiche de service à partir des critères.
Enfin, si nous trouvons bien une fiche de service, nous récupérons la cellule d’assistance associée pour la valoriser dans le champ Cellule d’assistance de la demande. Et nous enregistrons la modification.
Et voilà ! En 5 étapes, nous avons réalisé la mise à jour automatique de la cellule d’assistance à la création du ticket.
🚨 Alerte ! Alerte ! 🚨
J’ai eu l’occasion de voir chez certains clients des administrateurs ayant peu ou pas de connaissances en développement récupérer des scripts sur internet, et les copier-coller sur leur instance en ne modifiant quasiment rien, sans comprendre forcément comment ils fonctionnaient. Et cela peut créer de gros problèmes, comme vous pouvez l’imaginer.

N’utilisez jamais un script que vous ne comprenez pas sur votre instance de production. Vous devez maitriser un minimum ce que fait le script, sous peine d’altérer vos données irrémédiablement.
Utilisateur réalisant les opérations via le script
Certains scripts que vous mettrez en place réaliseront des actions au nom de l’utilisateur courant, c’est-à-dire l’utilisateur connecté qui est à l’origine du déclenchement du script. Il est donc nécessaire que ce dernier aie a minima les droits de réaliser les dites actions.
Dans certains cas, il n’est pas souhaitable d’ouvrir les droits aux utilisateurs. Il faut alors explicitement utiliser un compte dédié aux scripts et règles d’automatisation.
Etape 2 – Notifier les cellules d’assistance
Maintenant qu’une nouvelle demande est affectée à une cellule, il convient de prévenir les agents concernés (et seulement eux). Nous avions vu dans l’article précédent lors de la mise en place du modèle des Cellules d’assistance que certaines d’entre-elles souhaitaient ne pas être notifiées, ou encore être notifiées à une adresse mail générique, etc. Ces besoins spécifiques nous amènent à opter à nouveau pour la réalisation d’un script qui va se charger de gérer tous les cas.
Nous avons besoin que ce script s’active à chaque fois que la cellule associée à une demande change, c’est-à-dire lors du déclenchement d’un événement bien précis… Vous me voyez venir ? Oui, nous allons mettre en place un nouveau script Listener.
Avoir plusieurs scripts dédiés à une action plutôt qu’un seul script géant
Pourquoi ne pas simplement gérer la notification dans le script précédent ?
C’est une bonne question ! Et pour tout vous dire, au début, c’était bien le cas. Nous avions un script complet qui géré l’association de la cellule à la demande, puis la notification, tout en un. Cependant, avec les améliorations apportées, et l’apparition de nouveaux besoins, il a été nécessaire de séparer les deux scripts. De cette façon, nous pouvions utiliser le script de notification dans d’autres cas. Par exemple pour les équipes qui souhaitent pouvoir modifier manuellement la cellule responsable d’une demande.
C’est généralement une bonne pratique de séparer les usages dans des scripts ou fonctions dédiés.
Ce nouveau script doit se déclencher uniquement sur un événement bien précis. Pour maitriser son utilisation, nous créons un nouvel événement personnalisé Jira Assistance – Notification cellule sur lequel nous allons pouvoir nous appuyer. Vous pouvez consulter la documentation de l’éditeur (en anglais) pour en savoir plus sur comment ajouter un événement dans Jira.
Lorsque l’événement se déclenche, le script doit alors :
- Récupérer la cellule d’assistance associée à la demande ;
- Identifier les paramétrages spécifiques de la cellule : notification souhaitée ou non, utilisation d’un mail générique ou non, récupérer la liste des agents membres de la cellule, etc. ;
- Préparer et envoyer la notification par email aux bons destinataires.
Voici quelques extraits du script.
Script 2 – Notification de la cellule d’assistance affectée à une demande
Comme pour le script précédent, nous avons réalisé au préalable les imports des classes, la déclaration des constantes, et l’initialisation des services.
Pour éviter des erreurs inutiles, notamment sur une instance de recette par exemple, nous vérifions que les courriers sortants sont bien activés. Sinon, on peut s’arrêter là.
Nous récupérons la cellule d’assistance responsable de la demande.
Nous trouvons bien une cellule sur la demande. Nous pouvons vérifier ses particularités, c’est-à-dire si elle souhaite être notifiée, et si oui, sous quelle modalité :
- Uniquement les agents ;
- Uniquement l’adresse mail générique ;
- Tous les agents et l’adresse mail générique.
Si la cellule souhaite bien recevoir des notifications, nous pouvons préparer le mail : destinataires, objet et corps du message.
Il ne reste plus qu’à envoyer le mail. Pour cela, nous utilisons le service Jira SingleMailQueueItem qui va nous permettre d’ajouter notre mail dans la file des courriers électroniques sortants.
Maintenant que notre script de notification est prêt, nous devons ajouter dans notre premier script d’identification de la cellule d’assistance responsable un petit bout de code à la fin qui nous permet de déclencher l’événement Assistance – Notification cellule, dont voici un extrait :
Nous venons de poser les bases solides de notre automatisation. 🥳 Mais nous n’avons pas fini… En effet, nous devons maintenant gérer les cas d’usage complémentaires autour de la création de la demande.
Etape 3 – Ajuster la qualification d’une demande
Les agents doivent pouvoir modifier les choix de qualification de l’utilisateur suite à la création de la demande. Et cette modification peut alors impacter la cellule qui doit prendre en charge la demande.
Pour gérer cela, nous ajoutons une transition dédiée au changement des trois critères de qualification dans le workflow. Cette solution a l’avantage de :
- Maitriser la mise à jour de ces trois critères et les conséquences induites en limitant cette action à un seul endroit ;
- Pouvoir déclencher un événement précis lors de l’exécution de la transition, événement que nous pourrons ensuite « écouter » avec notre premier script.
Nous créons donc un nouvel événement personnalisé Assistance – Changement de qualification, que nous associons à notre transition Changer la qualification.
Nous ajoutons également ce nouvel événement sur notre premier script, que nous mettons à jour pour prendre en compte ce nouveau cas. Selon l’événement qui a déclenché le script (création ou changement de qualification), il convient de vérifier si la cellule déjà associée à la demande change et d’ajuster certaines opérations.
Côté transition, nous pensons bien à :
- Associer un écran de transition contenant nos trois champs de qualification (type de service, catégorie et sous-catégorie) ;
- Retirer le responsable actuel de la demande, la qualification pouvant impliquer un changement de cellule.

Etape 4 – Transférer une demande manuellement à une autre cellule d’assistance
Les trois équipes d’assistance souhaitent également permettre aux agents de pouvoir transférer manuellement une demande à une autre cellule. L’équipe Fraise, elle, souhaite que cela soit possible, mais uniquement vers une autre cellule intervenant sur le même périmètre.
Nous devons donc :
- Permettre aux agents de sélectionner une autre cellule d’assistance, indépendamment des critères de qualification de la demande ;
- Notifier la cellule sélectionnée.
Là encore, l’option la plus pertinente est d’ajouter une nouvelle transition dans le workflow (toujours pour un souci de maitrise et de réutilisation facilitée des scripts mis en place précédemment).
Nous ajoutons donc la nouvelle transition Changer la cellule responsable qui :
- Ouvre un écran proposant Cellule d’assistance. Nous appliquons à ce champ une contrainte pour le projet Fraise (via les contextes de champs que nous avons mis en place dans l’article précédent), afin de proposer uniquement les cellules de même périmètre d’intervention que la cellule actuelle ;
- Déclenche l’événement de notification de la cellule d’assistance.
Etape 5 – Finaliser le paramétrage
Maintenant que les mécaniques d’automatisation sont en place, nous pouvons finaliser le paramétrage de nos projets. Je ne m’étendrai pas dans cet article sur le paramétrage en détail, mais en synthèse, nous avons :
- Mis en place un schéma de configuration de champs afin de déclarer a minima nos trois champs de qualification comme obligatoire ;
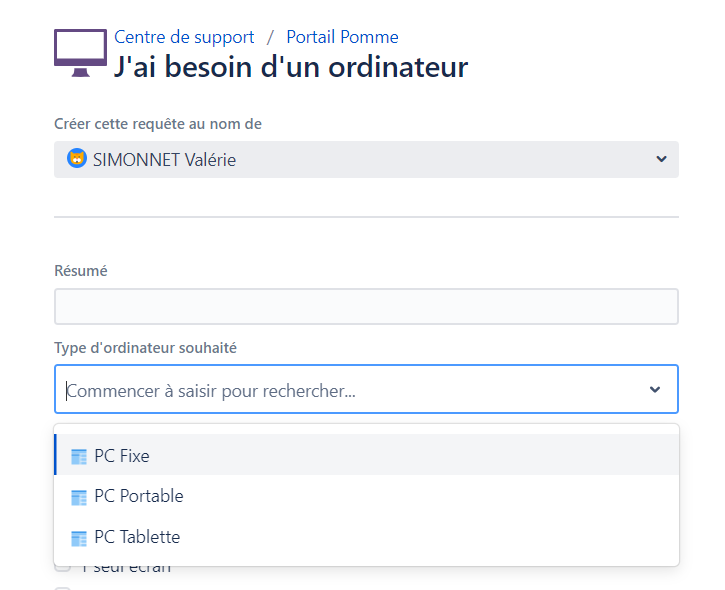
- Créé les formulaires de demande côté portail utilisateurs, avec parfois la valorisation automatique de certains champs de qualification. Par exemple, dans le formulaire Demander un nouvel ordinateur, nous avons caché et valorisé par défaut le type de service en Demande de matériel et la catégorie en Ordinateur. Seul le champ sous-catégorie est proposé, il est automatiquement filtré pour n’afficher que les valeurs cohérentes :
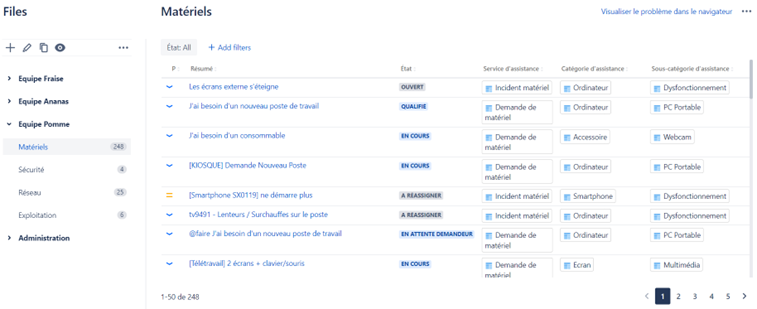
- Créé les files d’attente pour chaque cellule, afin qu’elles visualisent facilement les tâches à traiter :
- Configuré les écrans des projets pour ne pas proposer en modification directe les champs de qualification et la cellule d’assistance.
Remarque : mon client utilise un plugin permettant de mieux gérer les files d’attente, ce qui explique l’affichage légèrement différent de l’affichage standard dans les impressions d’écran ci-dessus.
Aller plus loin
Comme vu lors des précédents articles, nous ne nous sommes pas arrêtés là. Avec le temps et l’expérience, nous avons pu enrichir les différents projets selon les besoins des équipes, en nous appuyant sur les éléments déjà en place. Les scripts étant pensés pour toutes les équipes et ayant une dépendance entre eux minime, nous avons pu facilement y greffer nos nouveautés, dont voici quelques exemples :
- Mise en place d’un référentiel RH avec la notion de Fiche personne : les données des collaborateurs sont automatiquement chargées depuis l’Active Directory du groupe. La Fiche personne correspondant au rapporteur est ensuite associée automatiquement à sa demande, ce qui permet aux agents de visualiser en un coup d’œil les informations de ce dernier ;
- Intégration du catalogue des applications aux fiches de service et aux demandes d’assistance : l’application et le module concernés par une fiche de service sont renseignés au niveau de cette dernière, ce qui permet de valoriser automatiquement les champs correspondants sur les demandes d’assistance. Il est alors possible d’éditer des rapports sur le nombre de demandes sur une application donnée ;
- Intégration de la CMDB (référentiels des actifs) et particulièrement de la section Matériel aux demandes d’assistance : chaque équipement est associé à une personne, ce qui permet de remonter automatiquement dans une demande d’assistance l’ensemble des équipements du demandeur. Cela permet aux agents de vérifier rapidement le matériel déjà possédé par le rapporteur, et se faire une idée de la situation. Il est également possible de proposer un champ dans certains formulaires permettant au rapporteur de sélectionner le matériel sur lequel il rencontre une difficulté.
Ce ne sont que quelques exemples d’usages mis en place à l’aide de ces trois référentiels. Envie d’en savoir plus sur l’un de ces référentiels et leurs interactions avec les projets ? N’hésitez pas à m’écrire, je pourrai éventuellement rédiger un article complémentaire sur le sujet.
En conclusion
Ouf, on a enfin terminé ! Et nos efforts payent. Maintenant, l’utilisateur peut facilement ouvrir une demande sur l’un des portails d’assistance. Sa demande est automatiquement dirigée vers la cellule d’assistance la plus pertinente selon ses choix faits dans le formulaire. Les agents appartenant à la cellule seront notifiés lorsque cela est souhaité.
En cas d’erreur dans la préqualification réalisée par l’utilisateur, pas de souci : l’agent qui a pris en charge la demande peut facilement modifier les critères sélectionnés, ce qui redéclenche l’orientation vers la bonne cellule.
Enfin, nous avons aussi évoqué d’aller plus loin en enrichissant automatiquement les demandes avec des données provenant d’autres référentiels, comme l’application concernée par la demande ou encore des informations RH sur le demandeur.
Pour réaliser ce travail, nous avons vu que nous pouvions nous appuyer sur des fonctionnalités natives de Jira Service Management Data Center, mais qu’il était tout de même nécessaire pour certaines opérations d’utiliser un plugin de scripts tel que Script Runner.
Dans le prochain article, nous travaillerons sur la mise en place d’une mécanique d’escalade d’une demande vers les équipes de niveau 2.

Illustration de couverture par pch.vector sur Freepik